Simple Way to Prepare Quick Stir fry vegetables

Simple Way to Prepare Quick Stir fry vegetables

Stir fry vegetables.

Stir fry vegetables

Hello everybody, I hope you're having an incredible day today. Today, I'm gonna show you how to make a special dish, stir fry vegetables. It is one of my favorites. This time, I will make it a bit unique. This will be really delicious.

Stir fry vegetables is one of the most popular of current trending meals on earth. It is enjoyed by millions daily. It's simple, it's fast, it tastes delicious. They're nice and they look wonderful. Stir fry vegetables is something which I've loved my entire life.

To begin with this recipe, we have to first prepare a few components. You can have stir fry vegetables using 11 ingredients and 3 steps. Here is how you cook it.

The ingredients needed to make Stir fry vegetables:

  1. {Take of mushrooms.
  2. {Make ready of green peas.
  3. {Prepare of chopped capsicum.
  4. {Get of chopped carrots.
  5. {Get of thinly sliced onions.
  6. {Prepare of bay leaves.
  7. {Get of turmeric powder.
  8. {Prepare of ginger powder.
  9. {Make ready of black pepper, crushed.
  10. {Prepare of salt.
  11. {Prepare of butter/oil.

Instructions to make Stir fry vegetables:

  1. Clean, wash and pat dry the mushrooms. Chopped into halves. Blanch the fresh peas..
  2. Heat butter in pan. Add all the chopped veggies and turmeric powder. Stir fry in medium to high flame to keep the veggies crunchy. The pan should not be covered while cooking..
  3. Switch off the flame and add ginger powder, black pepper powder and salt. The stir fry vegetables is ready to serve. It can be used as a base for making noodles, soup, fried rice, roll by adding the masala flavor accordingly. Thanks.

So that's going to wrap this up for this exceptional food stir fry vegetables recipe. Thanks so much for your time. I am confident that you will make this at home. There's gonna be more interesting food at home recipes coming up. Don't forget to save this page in your browser, and share it to your loved ones, friends and colleague. Thanks again for reading. Go on get cooking!

Simple Way to Make Homemade Ebi-Fry or Ebi Furai (Japanese fried
shrimps)

Simple Way to Make Homemade Ebi-Fry or Ebi Furai (Japanese fried shrimps)

Ebi-Fry or Ebi Furai (Japanese fried shrimps).

Ebi-Fry or Ebi Furai (Japanese fried shrimps)

Hey everyone, it is John, welcome to our recipe site. Today, we're going to prepare a distinctive dish, ebi-fry or ebi furai (japanese fried shrimps). One of my favorites food recipes. For mine, I'm gonna make it a little bit unique. This is gonna smell and look delicious.

Ebi-Fry or Ebi Furai (Japanese fried shrimps) is one of the most well liked of recent trending foods on earth. It's enjoyed by millions every day. It is simple, it's fast, it tastes yummy. Ebi-Fry or Ebi Furai (Japanese fried shrimps) is something which I have loved my entire life. They are fine and they look fantastic.

To begin with this particular recipe, we must prepare a few components. You can have ebi-fry or ebi furai (japanese fried shrimps) using 10 ingredients and 12 steps. Here is how you can achieve that.

The ingredients needed to make Ebi-Fry or Ebi Furai (Japanese fried shrimps):

  1. {Take 6 of fresh large prawns, peeled and deveined.
  2. {Take of Coating:.
  3. {Make ready 3 tablespoons of tempura flour.
  4. {Make ready of Sprinkle salt and pepper (add to flour, optional).
  5. {Prepare 1 of large egg, beaten.
  6. {Make ready 3 tablespoons of panko breadcrumbs.
  7. {Make ready of Frying:.
  8. {Make ready 3 cups of vegetable oil (or any cooking oil).
  9. {Take of Garnish:.
  10. {Make ready of Tonkastu sauce or tartar sauce.

Instructions to make Ebi-Fry or Ebi Furai (Japanese fried shrimps):

  1. To peel prawns, remove the head and legs (keeping the last segment of the shell or just the tail in tact) and place in a large mixing bowl. Then place prawns on a chopping board..
  2. To devein a prawn, use a small sharp knife to make a slit along the middle of the back to expose the dark vein. Use your fingers to carefully pull the vein through the opening at the head end to remove..
  3. Once all of the prawns have been deveined place in a clean bowl of water. Remove any excess water from the tail. Hold the knife down on it and move it back and forth to squeeze out the water. Tip: doing this prevents any splatter of oil later during the frying process. Gently wash each prawn, cleaning inside the area where it's just been deveined..
  4. Transfer onto a clean chopping board lined with kitchen paper. Using another kitchen paper pat each of the prawns dry. Then remove the kitchen paper and place onto the chopping board..
  5. Turn the prawn over on its back (underside), make a few diagonal slits along it. Then using your fingers, either gently squeeze either side of the prawn or holding the shrimp belly up with both hands and bend it backwards to straighten and stretch out. Tip: try to straighten the prawn as much as possible. Then turn the prawn on its side and make a few slits along it. Repeat for the other side..
  6. Turn the prawn back on its back and using the side of the knife, gently flatten the prawn. Do not over bash it or it will become mushy. This makes the prawn flat and straight. Transfer into a plate and repeat process for the remaining prawns..
  7. In one bowl add flour and season with salt and pepper (optional), in another the crack the egg and beat it. In the last bowl add the panko breadcrumbs..
  8. Get a prawn and dip it into the flour. Coat it all over and shake off any excess flour. Then dip into the egg ensuring it's all covered. Let any excess egg drip back into the bowl before dipping it into the breadcrumbs. Coat all of the prawn well. Tip. When coating prawn at each stage ensure its covered properly..
  9. Once the prawn is generously coated in panko breadcrumbs. Shake off any excess and transfer onto a small baking tray or plate. Repeat the process for the remaining prawns. Tip: At this stage if your not frying the prawn tempura straight away. Cover baking tray with cling film and place in fridge..
  10. To fry the tempura, in a pot add the cooking oil. Let the oil heat up to 160 degrees. Once the oil is hot enough, gently place two breaded prawns in at a time. Using chopsticks, turn the tempura often to ensure even cooking all around..
  11. Once golden brown remove from the pot and transfer into a plate or baking tray lined with kitchen paper. Drain off any excess oil. Repeat steps for the remaining prawns..
  12. To serve transfer onto a plate and eat with with tartar or tonkastu sauce. Serve as a side dish to other accompaniments..

So that is going to wrap this up with this special food ebi-fry or ebi furai (japanese fried shrimps) recipe. Thanks so much for your time. I am confident that you can make this at home. There is gonna be more interesting food at home recipes coming up. Remember to save this page in your browser, and share it to your family, colleague and friends. Thanks again for reading. Go on get cooking!

Steps to Make Any-night-of-the-week Texas brisket

Steps to Make Any-night-of-the-week Texas brisket

Texas brisket.

Texas brisket

Hey everyone, I hope you're having an incredible day today. Today, I'm gonna show you how to make a special dish, texas brisket. It is one of my favorites. This time, I will make it a little bit tasty. This will be really delicious.

Texas brisket is one of the most well liked of current trending meals in the world. It's simple, it is quick, it tastes yummy. It is appreciated by millions daily. They are nice and they look wonderful. Texas brisket is something which I've loved my whole life.

To get started with this particular recipe, we must prepare a few ingredients. You can have texas brisket using 7 ingredients and 6 steps. Here is how you cook that.

The ingredients needed to make Texas brisket:

  1. {Make ready 1/2 cup of crushed red pepper.
  2. {Prepare 1 cup of Adkins bbq season.
  3. {Prepare 1 cup of black pepper.
  4. {Prepare 1/2 can of garlic powder.
  5. {Get 1/2 cup of onion powder.
  6. {Prepare of soy sauce.
  7. {Make ready of beef stock.

Steps to make Texas brisket:

  1. Place meat in container let rest in soy sauce and beef stock over night.
  2. Mix all seasoning together and blanket brisket (you can't over season so the more the better ).
  3. Get smoker to about 250 (leave uncovered let meat grab smoke) remember to not put meat close to heat source.
  4. After 4 hours cover brisket with foil and let cook for 6 more hours.
  5. At about 10 hours remove brisket from smoker and let rest for 45 mins.
  6. Slice or chop.

So that is going to wrap this up with this exceptional food texas brisket recipe. Thanks so much for your time. I'm confident that you can make this at home. There is gonna be interesting food in home recipes coming up. Don't forget to bookmark this page in your browser, and share it to your loved ones, colleague and friends. Thank you for reading. Go on get cooking!

Steps to Make Award-winning Strawberry & Rose Milkshake 🍓 🌹

Steps to Make Award-winning Strawberry & Rose Milkshake 🍓 🌹

Strawberry & Rose Milkshake 🍓 🌹.

Strawberry & Rose Milkshake 🍓 🌹

Hey everyone, it is me, Dave, welcome to our recipe site. Today, I will show you a way to make a special dish, strawberry & rose milkshake 🍓 🌹. One of my favorites. This time, I'm gonna make it a little bit tasty. This is gonna smell and look delicious.

Strawberry & Rose Milkshake 🍓 🌹 is one of the most well liked of recent trending foods on earth. It's enjoyed by millions every day. It's easy, it is quick, it tastes delicious. Strawberry & Rose Milkshake 🍓 🌹 is something which I've loved my entire life. They're nice and they look wonderful.

To get started with this particular recipe, we must first prepare a few ingredients. You can have strawberry & rose milkshake 🍓 🌹 using 4 ingredients and 2 steps. Here is how you can achieve that.

The ingredients needed to make Strawberry & Rose Milkshake 🍓 🌹:

  1. {Get 300 mls of ice cold milk (I used almond).
  2. {Take 1 of small banana.
  3. {Prepare Handful of 4 or 5 frozen strawberries.
  4. {Prepare 1-2 tsp of rose syrup.

Instructions to make Strawberry & Rose Milkshake 🍓 🌹:

  1. Blend all of the ingredients and 1 tsp of the rose syrup.. Strawberry & Rose Milkshake 🍓 🌹
  2. Taste the mix and add more rose syrup to taste. I added 2 tsp in the end. Give it a final whizz then pour into your glass..

So that's going to wrap this up with this exceptional food strawberry & rose milkshake 🍓 🌹 recipe. Thank you very much for your time. I am confident that you can make this at home. There's gonna be interesting food at home recipes coming up. Remember to bookmark this page in your browser, and share it to your family, colleague and friends. Thanks again for reading. Go on get cooking!

Steps to Prepare Super Quick Homemade Minced Meat Cutlet with Shiitake
Powder Packed with Umami Taste

Steps to Prepare Super Quick Homemade Minced Meat Cutlet with Shiitake Powder Packed with Umami Taste

Minced Meat Cutlet with Shiitake Powder Packed with Umami Taste.

Minced Meat Cutlet with Shiitake Powder Packed with Umami Taste

Hey everyone, it is Louise, welcome to my recipe page. Today, I will show you a way to prepare a special dish, minced meat cutlet with shiitake powder packed with umami taste. It is one of my favorites food recipes. This time, I will make it a bit tasty. This will be really delicious.

Minced Meat Cutlet with Shiitake Powder Packed with Umami Taste is one of the most popular of current trending meals in the world. It's simple, it's quick, it tastes delicious. It is appreciated by millions every day. They're nice and they look wonderful. Minced Meat Cutlet with Shiitake Powder Packed with Umami Taste is something which I've loved my whole life.

To begin with this recipe, we must first prepare a few components. You can have minced meat cutlet with shiitake powder packed with umami taste using 17 ingredients and 7 steps. Here is how you cook that.

The ingredients needed to make Minced Meat Cutlet with Shiitake Powder Packed with Umami Taste:

  1. {Take 450 g of minced beef and pork.
  2. {Take 1 of and a half (300g) onion (finely chopped).
  3. {Get 1 Tbsp of vegetable oil.
  4. {Prepare 150 g of cabbage (finely chopped).
  5. {Make ready 1 tbsp of ● Shiitake powder.
  6. {Take 4.5 gr of ● salt.
  7. {Make ready pinch of ● black pepper.
  8. {Get pinch of ● nutmeg.
  9. {Take 1 1/2 of egg.
  10. {Take As needed of Cake Flour.
  11. {Make ready as needed of Beaten eggs.
  12. {Get as needed of Panko breadcrumbs.
  13. {Make ready as needed of Frying oil.
  14. {Make ready 2 of potatoes (side dish).
  15. {Prepare 1/2 of carrot (garnish).
  16. {Get 10 g of butter (garnish).
  17. {Get to taste of Watercress (garnish),.

Instructions to make Minced Meat Cutlet with Shiitake Powder Packed with Umami Taste:

  1. Finely chop the onions and cabbage. Cube the potatoes and cut the carrots into sticks of 5cm long..
  2. Heat up half of the vegetable oil in the frying pan, then stir fry the onions until they become transparent and lay aside on a baking pan to cool..
  3. Fry the cabbage with the remaining vegetable oil, and lightly season with salt and pepper (not included in the above ingredients), then set aside to cool..
  4. Mix the ● condiments with the minced beef and pork and knead thoroughly. Once it becomes sticky, add the ingredients from 2. and 3. and mix thoroughly again before finally adding the eggs and mixing thoroughly..
  5. Separate 4. into 8 equal parts, mold them into oval shapes, and coat it first with flour, then beaten eggs, and finally panko breadcrumbs before frying in oil..
  6. (Fry with 180℃ oil, take out after 5 minutes and let it cool off for about 3 minutes, then fry for another 3 minutes.).
  7. (*Sides and Garnish) Boil the potatoes and carrot, and coat the potatoes with butter once cooked..

So that's going to wrap it up for this special food minced meat cutlet with shiitake powder packed with umami taste recipe. Thanks so much for your time. I am confident you can make this at home. There's gonna be more interesting food in home recipes coming up. Remember to bookmark this page in your browser, and share it to your loved ones, friends and colleague. Thank you for reading. Go on get cooking!

Simple Way to Make Ultimate Mum’s Sweet and Sour Pork

Simple Way to Make Ultimate Mum’s Sweet and Sour Pork

Mum’s Sweet and Sour Pork.

Mum’s Sweet and Sour Pork

Hello everybody, it is Drew, welcome to my recipe site. Today, I will show you a way to make a distinctive dish, mum’s sweet and sour pork. It is one of my favorites food recipes. This time, I am going to make it a bit unique. This is gonna smell and look delicious.

Mum’s Sweet and Sour Pork is one of the most well liked of current trending foods in the world. It is simple, it's fast, it tastes yummy. It is enjoyed by millions every day. They are fine and they look wonderful. Mum’s Sweet and Sour Pork is something which I have loved my entire life.

To get started with this particular recipe, we must prepare a few ingredients. You can have mum’s sweet and sour pork using 10 ingredients and 5 steps. Here is how you can achieve that.

The ingredients needed to make Mum’s Sweet and Sour Pork:

  1. {Take 1 packet of sweet and sour pork.
  2. {Take 3 tbsp of plum sauce.
  3. {Prepare 1 tbsp of ketchup.
  4. {Get 1 tbsp of chilli.
  5. {Take 1 tbsp of light sauce.
  6. {Make ready 1 tbsp of oyster sauce.
  7. {Make ready 1 tbsp of sesame oil.
  8. {Prepare 1 tsp of sugar.
  9. {Make ready 1/2 of plain flour 1/2 corn flour.
  10. {Get 3-4 pcs of butter biscuits.

Steps to make Mum’s Sweet and Sour Pork:

  1. Marinate pork with light sauce, oyster sauce, sesame oil, sugar and butter biscuit. Refrigerate.
  2. Mix plum sauce, ketchup and chilli sauce..
  3. Coat marinated pork in flour (mix in plastic bag). Put in freezer for 15-30 mins..
  4. Deep fry marinated pork with medium heat, increase fire and refry everything..
  5. Chop some onions, stir fry with a little bit of oil. Lower fire and heat sauce till boil, add fried pork. Off fire and mix well..

So that is going to wrap it up with this special food mum’s sweet and sour pork recipe. Thanks so much for your time. I'm confident that you can make this at home. There is gonna be more interesting food at home recipes coming up. Don't forget to bookmark this page on your browser, and share it to your loved ones, colleague and friends. Thank you for reading. Go on get cooking!

Recipe of Award-winning Mike's Korean Noodles [JAJANGMYEON]

Recipe of Award-winning Mike's Korean Noodles [JAJANGMYEON]

Mike's Korean Noodles [JAJANGMYEON].

Mike's Korean Noodles [JAJANGMYEON]

Hey everyone, it is Brad, welcome to our recipe page. Today, I'm gonna show you how to make a distinctive dish, mike's korean noodles [jajangmyeon]. It is one of my favorites. For mine, I will make it a little bit unique. This will be really delicious.

Mike's Korean Noodles [JAJANGMYEON] is one of the most favored of recent trending meals in the world. It's easy, it's quick, it tastes delicious. It is appreciated by millions every day. Mike's Korean Noodles [JAJANGMYEON] is something that I've loved my whole life. They are fine and they look wonderful.

To begin with this recipe, we have to prepare a few ingredients. You can have mike's korean noodles [jajangmyeon] using 20 ingredients and 9 steps. Here is how you can achieve it.

The ingredients needed to make Mike's Korean Noodles [JAJANGMYEON]:

  1. {Make ready of ● For The Noodles.
  2. {Prepare 16 oz of Korean Noodles [udon noodles work excelent as well].
  3. {Prepare as needed of Hot Korean Chili Oil.
  4. {Prepare of ● For The Bean Sauce.
  5. {Prepare 1 Cup of Small Cubed Pork.
  6. {Take 1 Cup of Korean Black Bean Sauce.
  7. {Prepare 1/2 Cup of Small Cubed Potatoes.
  8. {Prepare 1/2 of Medium White Onion [fine diced].
  9. {Make ready 1/2 Cup of Shitaka Mushrooms [halved].
  10. {Prepare of ● For The Sides.
  11. {Get as needed of Boiled Eggs [halved].
  12. {Prepare of Diakon Radishes [toothpick cut - garnish - optional].
  13. {Get of Toasted Sesame Seeds [garnish].
  14. {Get as needed of Hot Korean Chili Oil.
  15. {Get of Spring Rolls [side dish].
  16. {Get of Chilled Korean Kimchi [side dish].
  17. {Prepare as needed of Soy Sauce [side].
  18. {Take as needed of Sweet Chili Sauce [side].
  19. {Make ready as needed of Siricha Sauce.
  20. {Take as needed of Oyster Sauce.

Steps to make Mike's Korean Noodles [JAJANGMYEON]:

  1. Sauté your pork, potatoes, onions and mushrooms in oil until cooked. Add bean sauce + water and simmer for 5 minutes longer. Stir regularly..
  2. Fully cooked bean paste sauce with pork and raw Korean Noodles pictured..
  3. In the meantime, bake your Korean Spring Rolls as per manufacturers directions. Usually 7 to 10 minutes. Or, until crispy. Turn rolls once. Feel free to also serve with my chilled DIM SUM Garlic Ginger or Sweet Chili Soy Sauce..
  4. Boil noodles as per manufacturers directions. Usually about 3 minutes or less..
  5. Drain noodles. Do not rinse. Add hot chili oil to noodles and mix immediately. Add noodles to individual bowls..
  6. Serve with hot bean sauce, sliced boiled eggs, chilled Korean Kimchi, crispy Korean Spring Rolls, chilled Sweet Chili Dip, additional sauces, light Soy Sauce and ice cold Asian Beer..
  7. One heck of a delicious chilled Korean Kimchi brand! Easily found at your local Asian market..
  8. Know this dish makes for excellent leftovers for work! Siricha sauce piled at the left side of this dish for mixing..
  9. Enjoy your tiny taste of South Korea!.

So that's going to wrap it up for this exceptional food mike's korean noodles [jajangmyeon] recipe. Thanks so much for reading. I am confident you can make this at home. There's gonna be interesting food at home recipes coming up. Remember to save this page in your browser, and share it to your family, friends and colleague. Thanks again for reading. Go on get cooking!

How to Make Super Quick Homemade Pineapple Tuna Cakes

How to Make Super Quick Homemade Pineapple Tuna Cakes

Pineapple Tuna Cakes.

Pineapple Tuna Cakes

Hey everyone, it's Drew, welcome to my recipe page. Today, I will show you a way to make a distinctive dish, pineapple tuna cakes. It is one of my favorites food recipes. For mine, I'm gonna make it a little bit tasty. This will be really delicious.

Pineapple Tuna Cakes is one of the most favored of recent trending meals in the world. It's simple, it's quick, it tastes yummy. It is enjoyed by millions every day. Pineapple Tuna Cakes is something which I've loved my whole life. They're fine and they look fantastic.

To get started with this particular recipe, we must prepare a few ingredients. You can cook pineapple tuna cakes using 17 ingredients and 9 steps. Here is how you cook it.

The ingredients needed to make Pineapple Tuna Cakes:

  1. {Get of Your choice of Spanish style rice.
  2. {Get of Tuna in water.
  3. {Make ready of as needed Ritz crackers maybe two packages.
  4. {Get of as needed Egg.
  5. {Make ready of Newmans organic pineapple salsa.
  6. {Get of Salt.
  7. {Prepare of Pepper.
  8. {Make ready of Garlic powder.
  9. {Make ready of Onion powder.
  10. {Prepare of Adobo.
  11. {Get of Avacado.
  12. {Prepare of Roma tomato.
  13. {Make ready of as needed Olive oil.
  14. {Take of as needed Apple cider vinegar.
  15. {Make ready of Corn kernels.
  16. {Make ready of as needed Shredded mozzarella cheese.
  17. {Take of Sugar.

Steps to make Pineapple Tuna Cakes:

  1. First you want to prepare the salsa take your avacado and tomato and chop into little squares.
  2. Add your drained corn to the bowl combining all three ingredients.
  3. Season with a dash of salt, pepper, and sugar... You can add along the way to taste as well.
  4. You want to add enough olive oil to where it Is lightly coating the salsa then add a splash of Apple cider vinegar. Use a spatula to mix the salsa and be careful not to mush it. Taste your salsa it may need more salt, pepper, sugar,etc. Gently mix it up well and store in the refrigerator to cool..
  5. Cook your choice of Spanish style rice as given on the box. We love the rice a roni Spanish style with vermicelli. When the rice is done stir in some shredded mozzarella. As much to your liking. While this is cooking you will prepare the cakes..
  6. Drain tuna and place in large bowl. Add all ingredients egg, salt, pepper, onion & garlic powder, adobo, half of the can of salsa and about two bundles of ritz crackers (crushed). Combine one bundle of crackers first mix it all up with your hands and the consistency should easily form a patty . If it's still a little mushy add a few more crackers..
  7. Add a light layer of butter to your frying pan and let it heat a little above medium heat while you form your tuna cakes.
  8. Place tuna cakes into frying pan( do not use a skillet) cook until nice and brown on both sides approximately 7-8mins per side.
  9. Rice goes into the plate first add a little mozz cheese on top and by little I mean a sprinkle place your tuna cake on top of the rice get your salsa give it a stir and place on top of the tuna cake and enjoy..

So that's going to wrap this up with this exceptional food pineapple tuna cakes recipe. Thanks so much for your time. I am sure that you can make this at home. There is gonna be interesting food at home recipes coming up. Remember to bookmark this page on your browser, and share it to your loved ones, colleague and friends. Thanks again for reading. Go on get cooking!

How to Make Speedy Salmon & Chinese Cabbage Gratin Soup

How to Make Speedy Salmon & Chinese Cabbage Gratin Soup

Salmon & Chinese Cabbage Gratin Soup.

Salmon & Chinese Cabbage Gratin Soup

Hey everyone, it's me again, Dan, welcome to our recipe page. Today, I will show you a way to make a distinctive dish, salmon & chinese cabbage gratin soup. It is one of my favorites food recipes. For mine, I'm gonna make it a little bit tasty. This is gonna smell and look delicious.

Salmon & Chinese Cabbage Gratin Soup is one of the most popular of recent trending meals on earth. It is easy, it's quick, it tastes yummy. It's appreciated by millions every day. Salmon & Chinese Cabbage Gratin Soup is something that I've loved my whole life. They're nice and they look fantastic.

To begin with this recipe, we must first prepare a few components. You can have salmon & chinese cabbage gratin soup using 12 ingredients and 6 steps. Here is how you can achieve that.

The ingredients needed to make Salmon & Chinese Cabbage Gratin Soup:

  1. {Prepare 1 large of piece Raw salmon.
  2. {Get 1/2 tbsp of Cooking sake.
  3. {Take 200 grams of Chinese cabbage.
  4. {Get 1 of Japanese leek.
  5. {Take 1 of if shimeji or enoki, half a bag; if shiitake about 2 Mushrooms.
  6. {Take 1 slice of Bacon.
  7. {Get 150 ml of ▲Milk.
  8. {Get 1 tbsp of ▲White Miso.
  9. {Take 2 tbsp of ▲Refined cooking sake.
  10. {Make ready 1/3 tsp of ▲Soup stock granules (Western style).
  11. {Take 70 ml of Milk.
  12. {Make ready 1 tsp of starch + 1 tablespoon water Katakuriko slurry.

Instructions to make Salmon & Chinese Cabbage Gratin Soup:

  1. Skin and de-bone the salmon, cut into bite-sized pieces, and sprinkle with the ● cooking sake (1/2 tablespoon). Set aside..
  2. Cut the Chinese cabbage core into 1 cm wide pieces, and the leaves into 3 cm wide pieces. Cut the leek into 1 cm diagonal pieces, and cut the mushrooms into bite-sized pieces..
  3. Add the ▲-marked ingredients to a frying pan and bring to a boil. Once boiling, add the ingredients from Step 2, then from Step 1 above that, and cook on medium heat until the cabbage becomes soft, for about 8 to 10 minutes..
  4. Add the ■ milk (70 ml) while checking the flavor. After checking the flavor, add the water-dissolved katakuriko. Avoid disturbing the salmon..
  5. Transfer to a heat-resistant container and top with cheese above the salmon..
  6. Bake in a toaster oven until the cheese is golden brown..

So that is going to wrap it up for this special food salmon & chinese cabbage gratin soup recipe. Thank you very much for reading. I'm sure you can make this at home. There is gonna be more interesting food at home recipes coming up. Remember to save this page on your browser, and share it to your loved ones, colleague and friends. Thanks again for reading. Go on get cooking!

Recipe of Speedy Stir Fry veggie salad with grilled cottage cheese

Recipe of Speedy Stir Fry veggie salad with grilled cottage cheese

Stir Fry veggie salad with grilled cottage cheese.

Stir Fry veggie salad with grilled cottage cheese

Hello everybody, it is John, welcome to our recipe page. Today, we're going to make a distinctive dish, stir fry veggie salad with grilled cottage cheese. One of my favorites food recipes. This time, I'm gonna make it a little bit unique. This will be really delicious.

Stir Fry veggie salad with grilled cottage cheese is one of the most favored of recent trending foods in the world. It's simple, it's fast, it tastes delicious. It is appreciated by millions every day. Stir Fry veggie salad with grilled cottage cheese is something that I have loved my whole life. They are nice and they look wonderful.

To begin with this recipe, we must first prepare a few components. You can cook stir fry veggie salad with grilled cottage cheese using 22 ingredients and 8 steps. Here is how you can achieve it.

The ingredients needed to make Stir Fry veggie salad with grilled cottage cheese:

  1. {Take of Salad bowl.
  2. {Take 1 bunch of lettuce leaves.
  3. {Make ready 1 tsp of sesame seed.
  4. {Take of For Grill Cottage Cheese.
  5. {Make ready 100 Gms of paneer/ cottage cheese.
  6. {Make ready 1 tsp of Soy sauce.
  7. {Prepare 1 tsp of Vinegar.
  8. {Prepare as per taste of Salt.
  9. {Get of Vegetable stir fry.
  10. {Make ready 2 tsp of butter.
  11. {Make ready 8-10 of mushroom.
  12. {Prepare 6-7 of broccoli flowers.
  13. {Get 1/2 cup of bell pepper.
  14. {Make ready 1/4 cup of boiled corns.
  15. {Get 1/4 tsp of black pepper powder.
  16. {Take 1/2 tsp of Soy sauce.
  17. {Get 1 tsp of ginger garlic paste.
  18. {Get As required of Tomato ketchup (optional).
  19. {Prepare as needed of Red chilli flakes optional.
  20. {Make ready as per taste of Salt.
  21. {Make ready of For garnishing.
  22. {Get 1 tsp of sesame seed (white).

Steps to make Stir Fry veggie salad with grilled cottage cheese:

  1. Take 100 gms paneer/ cottage cheese, pour in some soy sauce, Vinegar,butter, salt As per taste and coat them well like this.. Stir Fry veggie salad with grilled cottage cheese
  2. Now take a pan add some butter and cook them until they turn golden brown and cooked from both the sides.. Stir Fry veggie salad with grilled cottage cheese
  3. Now time to stir fry the vegetables add some butter to a pan then add in your favourite vegetables. Stir Fry veggie salad with grilled cottage cheese
    Stir Fry veggie salad with grilled cottage cheese
    Stir Fry veggie salad with grilled cottage cheese
  4. Add bell pepper, mushroom, baby corn, sweet corn, broccoli etc. Stir Fry veggie salad with grilled cottage cheese
    Stir Fry veggie salad with grilled cottage cheese
    Stir Fry veggie salad with grilled cottage cheese
  5. Then add in black pepper powder, soy sauce,ginger garlic paste salt as/ taste, give a good mix and cook well.. Stir Fry veggie salad with grilled cottage cheese
    Stir Fry veggie salad with grilled cottage cheese
    Stir Fry veggie salad with grilled cottage cheese
  6. Don't overcook let the vegetables retain their crunchiness.. Stir Fry veggie salad with grilled cottage cheese
  7. Now take a big salad bowl place some lettuce leaf, add Vegetables and some paneer/ tufu pieces and mix well with the veggies.. Stir Fry veggie salad with grilled cottage cheese
    Stir Fry veggie salad with grilled cottage cheese
  8. Sprinkle some white sesame seed and enjoy with Mojito, Garlic bread.

So that's going to wrap this up with this exceptional food stir fry veggie salad with grilled cottage cheese recipe. Thank you very much for your time. I am confident you will make this at home. There is gonna be more interesting food at home recipes coming up. Remember to save this page on your browser, and share it to your family, friends and colleague. Thank you for reading. Go on get cooking!

Step-by-Step Guide to Make Favorite Chao Fan (Chinese Fried Rice)

Step-by-Step Guide to Make Favorite Chao Fan (Chinese Fried Rice)

Chao Fan (Chinese Fried Rice).

Chao Fan (Chinese Fried Rice)

Hey everyone, hope you are having an incredible day today. Today, I will show you a way to prepare a special dish, chao fan (chinese fried rice). One of my favorites. For mine, I'm gonna make it a little bit unique. This will be really delicious.

Chao Fan (Chinese Fried Rice) is one of the most well liked of recent trending foods in the world. It is easy, it is fast, it tastes yummy. It's appreciated by millions daily. They are fine and they look fantastic. Chao Fan (Chinese Fried Rice) is something which I have loved my entire life.

To get started with this particular recipe, we must prepare a few components. You can cook chao fan (chinese fried rice) using 10 ingredients and 3 steps. Here is how you can achieve that.

The ingredients needed to make Chao Fan (Chinese Fried Rice):

  1. {Prepare of cooked rice.
  2. {Make ready of butter.
  3. {Get of garlic, minced.
  4. {Take of onion, minced.
  5. {Get of ham, minced.
  6. {Make ready of chinese mushrooms, minced.
  7. {Prepare of knorr garlic seasoning.
  8. {Make ready of salt.
  9. {Get of ground black pepper.
  10. {Get of carrot, minced.

Steps to make Chao Fan (Chinese Fried Rice):

  1. Melt butter in a wok or deep saucepan. Saute the garlic, onion, ham, mushroom and carrots..
  2. Add rice. Mix well to avoid the rice from sticking to the pan and burning..
  3. Add the seasoning, salt and pepper. Serve hot..

So that is going to wrap it up for this special food chao fan (chinese fried rice) recipe. Thank you very much for reading. I'm sure you can make this at home. There's gonna be interesting food at home recipes coming up. Don't forget to save this page on your browser, and share it to your loved ones, friends and colleague. Thank you for reading. Go on get cooking!

Recipe of Favorite Quick & Easy Basic Meat and Miso

Recipe of Favorite Quick & Easy Basic Meat and Miso

Quick & Easy Basic Meat and Miso. Перевод слова quick, американское и британское произношение, транскрипция, словосочетания, однокоренные слова, примеры использования. Quick, as an adjective, refers to something moving with high speed. Quick may also refer to: Quick (restaurant), a Belgian fast-food restaurant chain.

Quick & Easy Basic Meat and Miso From Middle English quik, quic, from Old English cwic ("alive"), from Proto-West Germanic *kwik(k)w, from Proto-Germanic *kwikwaz, from Proto-Indo-European *gʷih₃wós ("alive"), from *gʷeyh₃- ("to live"), *gʷeyh₃w- ("to live"). Quick definition is - acting or capable of acting with speed: such as. Quick — (von englisch „schnell") bezeichnet: Quick (Zeitschrift), ein ehemaliges deutsches Zeitungsmagazin Quick (Geldkarte), die elektronische Geldbörse in Österreich Quick.

Hey everyone, hope you're having an amazing day today. Today, I'm gonna show you how to prepare a special dish, quick & easy basic meat and miso. One of my favorites food recipes. For mine, I will make it a bit unique. This will be really delicious.

Quick & Easy Basic Meat and Miso is one of the most popular of current trending foods in the world. It's appreciated by millions daily. It's easy, it is quick, it tastes delicious. They are nice and they look wonderful. Quick & Easy Basic Meat and Miso is something which I've loved my whole life.

Перевод слова quick, американское и британское произношение, транскрипция, словосочетания, однокоренные слова, примеры использования. Quick, as an adjective, refers to something moving with high speed. Quick may also refer to: Quick (restaurant), a Belgian fast-food restaurant chain.

To get started with this particular recipe, we must first prepare a few components. You can have quick & easy basic meat and miso using 9 ingredients and 6 steps. Here is how you cook that.

The ingredients needed to make Quick & Easy Basic Meat and Miso:

  1. {Take of Ground meat (pork or beef/pork mix).
  2. {Prepare of Japanese leek.
  3. {Prepare of ● Miso.
  4. {Get of ● Sake (or water).
  5. {Make ready of ● Sugar.
  6. {Prepare of ● Soy sauce.
  7. {Make ready of Ginger (grated).
  8. {Prepare of Doubanjiang.
  9. {Make ready of Sesame oil.

Quick Spa is an international leader in the production and. Get Quickswap price, QUICK chart in real-time, volume, market cap, exchanges and more. View MC²X Series AC. 下载 - Quicker. Quick Heal best internet security software, now track your stolen laptop with laptop tracking software, best virus protection anti spam software, top antivirus software.

Instructions to make Quick & Easy Basic Meat and Miso:

  1. Mix the ● ingredients together to make the miso sauce. Take the root and green parts off the leek and finely chop the white part..
  2. Heat some oil in a frying pan and stir fry the ground meat, ginger and doubanjiang. (If you're using a non-stick pan, there's no need to use oil.).
  3. When the meat changes color, add the combined miso sauce and chopped leek, and stir fry..
  4. Stir fry over medium heat for about 3 to 5 minutes, reducing the moisture until the meat is still moist. Drizzle in the sesame oil and it's done..
  5. Today I used it in lettuce wraps..
  6. I added crispy-crunchy lotus root. Add 100 g of cooked lotus root (canned or vacuum packed) to the basic recipe..

So that's going to wrap it up for this exceptional food quick & easy basic meat and miso recipe. Thanks so much for your time. I am confident that you will make this at home. There's gonna be more interesting food at home recipes coming up. Remember to save this page in your browser, and share it to your loved ones, colleague and friends. Thanks again for reading. Go on get cooking!

How to Make Favorite Crispy Drumsticks

How to Make Favorite Crispy Drumsticks

Crispy Drumsticks.

Crispy Drumsticks

Hello everybody, I hope you're having an amazing day today. Today, I'm gonna show you how to prepare a distinctive dish, crispy drumsticks. One of my favorites. For mine, I will make it a little bit tasty. This will be really delicious.

Crispy Drumsticks is one of the most popular of recent trending foods in the world. It's easy, it is quick, it tastes yummy. It's enjoyed by millions daily. Crispy Drumsticks is something which I've loved my entire life. They're nice and they look fantastic.

To get started with this particular recipe, we have to first prepare a few ingredients. You can have crispy drumsticks using 12 ingredients and 6 steps. Here is how you can achieve that.

The ingredients needed to make Crispy Drumsticks:

  1. {Prepare of chicken leg piece 4.
  2. {Take of soya sauce.
  3. {Take 1 tbsp of Chilli sauce.
  4. {Take to taste of Salt.
  5. {Make ready tsp of Black pepper quarter.
  6. {Prepare 1 of Egg.
  7. {Prepare 1 cup of Plain Flour.
  8. {Get 1 cup of Cold water.
  9. {Prepare of Oil half cup.
  10. {Prepare of Baking powder half tsp.
  11. {Prepare 1 tsp of Ginger garlic paste.
  12. {Prepare 1 tbsp of Vinegar.

Instructions to make Crispy Drumsticks:

  1. Wash drum sticks and marinate it with vinegar ginger garlic paste, salt pepper, 1 tbsp of each sauces and salt for one hour and put in pot and cook in slow flame with closed lid for 10 min..
  2. Then open lid and turn flame to medium high and cook until all water left by chicken dries up. keep aside and let it cool..
  3. Beat one egg and mix in meat. in seprate bowl Add all dry ingredients and seive it twice..
  4. Now take chicken piece coat it in dry flour mixture coat well. now dip in cold water and coat again in flour you can repeat this for 3 time if you want more crispeness.... keep it in refrigerate for atleast 15 min before frying.
  5. Take a pot let it warm then add oil and let it heat up now turn flame to mediun and fry chicken pieces until golden brown..
  6. Tips: Steaming before frying is to ensure that chicken will be cooked properly. Seiving flour will make the coating light and super crispy. it is important to keep chicken in cold place before frying so that coating will remain intact on chicken while frying..

So that's going to wrap this up for this special food crispy drumsticks recipe. Thanks so much for your time. I'm sure that you can make this at home. There is gonna be interesting food at home recipes coming up. Don't forget to bookmark this page in your browser, and share it to your loved ones, colleague and friends. Thank you for reading. Go on get cooking!

Easiest Way to Make Award-winning Chicken biryani

Easiest Way to Make Award-winning Chicken biryani

Chicken biryani. Chicken Dum Biryani-Hyderabadi Chicken Dum Biryani Step by Step-Chicken Biryani Restaurant Style.. Traditional chicken biryani is made by layering marinated chicken and then layered with parboiled rice, herbs,saffron milk & then ghee. I have shared that traditional hyderabadi biryani here.

Chicken biryani Chicken Biryani is a delicious savory rice dish that is loaded with spicy marinated chicken For my Biryani, I simplify the order of operations, while retaining the traditional layered approach to. Making a chicken biryani is a lengthy. Biryani is a classic Indian dish that is often served at weddings and celebrations.

Hey everyone, it's John, welcome to my recipe site. Today, we're going to prepare a distinctive dish, chicken biryani. It is one of my favorites. For mine, I'm gonna make it a little bit unique. This is gonna smell and look delicious.

Chicken biryani is one of the most popular of recent trending foods in the world. It's enjoyed by millions daily. It's simple, it is quick, it tastes delicious. Chicken biryani is something which I have loved my entire life. They're nice and they look fantastic.

Chicken Dum Biryani-Hyderabadi Chicken Dum Biryani Step by Step-Chicken Biryani Restaurant Style.. Traditional chicken biryani is made by layering marinated chicken and then layered with parboiled rice, herbs,saffron milk & then ghee. I have shared that traditional hyderabadi biryani here.

To get started with this recipe, we must first prepare a few components. You can have chicken biryani using 13 ingredients and 10 steps. Here is how you can achieve it.

The ingredients needed to make Chicken biryani:

  1. {Take 500 gram of chicken.
  2. {Prepare 2 of Potatoes cut into halves.
  3. {Make ready 4 cup of basmati rice boiled.
  4. {Make ready 1 of tomato chopped.
  5. {Get 2 of onion chopped.
  6. {Prepare 1 tsp of ginger paste.
  7. {Make ready 1 tbsp of garlic paste.
  8. {Get 1 tsp of red chilli Powder.
  9. {Take 1/2 tsp of turmeric powder.
  10. {Prepare 1 cup of milk with kesar.
  11. {Prepare 1 tbsp of biryani masala.
  12. {Take To taste of salt and sugar.
  13. {Get As needed of oil and ghee.

However, it is a common dish to occasionally be made at home for dinner. Chicken Biryani is one of the more complicated rice dishes in Indian/pakistani cooking. Being quite an amateur cook I still managed to cook up a feast with this single dish and my hubby is still licking his. This chicken biryani recipe has been one of the most requested reader recipes and I'm so excited to share it with you today.

Instructions to make Chicken biryani:

  1. Marinate the chicken with salt turmeric powder ginger garlic and red chilli Powder.
  2. Heat oil and add onion chopped saute well till it is golden brown add Potatoes.
  3. Add ginger garlic paste and saute well.
  4. Now add the chicken pieces and saute well adding red chilli Powder.
  5. Cover and cook till it is soft.
  6. Add tomato stir well adding biryani masala and ghee.
  7. Now cover it with rice.
  8. Sprinkle kesar soaked milk and ghee.
  9. Keep the heat low and cook for 10-15 minutes.
  10. Serve it with raita and salad.

I had never made chicken biryani before I decided to share this recipe. An authentic Chicken Biryani recipe with simple, easy-to-follow instructions and mouthwatering, traditional Pakistani and Indian flavor. This chicken biryani recipe is easy and delicious. Find more dinner inspiration at BBC Good Food. Biryani is also known as biryani, briyani or biriyani.

So that is going to wrap it up with this exceptional food chicken biryani recipe. Thank you very much for your time. I'm sure that you will make this at home. There is gonna be interesting food at home recipes coming up. Remember to save this page on your browser, and share it to your loved ones, friends and colleague. Thank you for reading. Go on get cooking!

How to Prepare Favorite Spicy hot Egg Fried Rice. 🥰

How to Prepare Favorite Spicy hot Egg Fried Rice. 🥰

Spicy hot Egg Fried Rice. 🥰.

Spicy hot Egg Fried Rice. 🥰

Hello everybody, I hope you are having an incredible day today. Today, we're going to make a distinctive dish, spicy hot egg fried rice. 🥰. It is one of my favorites food recipes. For mine, I'm gonna make it a little bit unique. This is gonna smell and look delicious.

Spicy hot Egg Fried Rice. 🥰 is one of the most popular of current trending foods in the world. It is simple, it is fast, it tastes delicious. It is enjoyed by millions daily. Spicy hot Egg Fried Rice. 🥰 is something that I've loved my whole life. They are fine and they look wonderful.

To get started with this particular recipe, we must prepare a few ingredients. You can cook spicy hot egg fried rice. 🥰 using 7 ingredients and 3 steps. Here is how you can achieve it.

The ingredients needed to make Spicy hot Egg Fried Rice. 🥰:

  1. {Make ready of Enough cold cooked rice for 2 persons.
  2. {Get 1 of egg.
  3. {Make ready 1 tbls of sesame oil.
  4. {Take 1 tbls of Oyster sauce.
  5. {Take 1 tbls of light Soy sauce.
  6. {Get 4 of little red birdseye chillies( if you dont like it too hot use2.
  7. {Prepare of Some spring onions and some to garnish.

Instructions to make Spicy hot Egg Fried Rice. 🥰:

  1. In a wok heat up the pan add the sesame oil heat up then add the rice and chillies..
  2. Next step stir the rice around then make a well in the middle add the egg give it a quick scramble and mix in with the rice.
  3. Next add the oyster and soy sauce mix in and serve I a dish with sprinkles of chopped green spring onion on top.

So that is going to wrap this up for this special food spicy hot egg fried rice. 🥰 recipe. Thanks so much for your time. I'm sure you can make this at home. There is gonna be interesting food at home recipes coming up. Don't forget to save this page in your browser, and share it to your family, friends and colleague. Thanks again for reading. Go on get cooking!

How to Make Speedy Sweet & sour chunky mango chilli chicken

How to Make Speedy Sweet & sour chunky mango chilli chicken

Sweet & sour chunky mango chilli chicken.

Sweet & sour chunky mango chilli chicken

Hello everybody, it is Drew, welcome to my recipe page. Today, I'm gonna show you how to prepare a special dish, sweet & sour chunky mango chilli chicken. One of my favorites. For mine, I'm gonna make it a bit tasty. This is gonna smell and look delicious.

Sweet & sour chunky mango chilli chicken is one of the most well liked of current trending foods on earth. It's easy, it's quick, it tastes yummy. It's enjoyed by millions daily. They are fine and they look wonderful. Sweet & sour chunky mango chilli chicken is something which I have loved my entire life.

To begin with this recipe, we must first prepare a few components. You can cook sweet & sour chunky mango chilli chicken using 22 ingredients and 12 steps. Here is how you cook that.

The ingredients needed to make Sweet & sour chunky mango chilli chicken:

  1. {Get of Chicken marinate.
  2. {Make ready 250 gms of chicken boneless.
  3. {Prepare 3 tbsp of corn flour.
  4. {Make ready 1/2 tsp of salt.
  5. {Make ready 1/2 tsp of red chilli powder.
  6. {Get 1 tbsp of lemon juice.
  7. {Get of Oil for frying.
  8. {Make ready of Gravy.
  9. {Get 2 tbsp of honey.
  10. {Take 1 tbsp of lemon juice.
  11. {Take 1 tsp of sweet soya sauce.
  12. {Prepare 1 tsp of chilli sauce.
  13. {Get 1 tsp of red chilli flakes.
  14. {Prepare 2 cloves of garlic.
  15. {Prepare as needed of Water.
  16. {Get 1 tbsp of tomato ketchup.
  17. {Take 2 tbsp of mango puree.
  18. {Prepare 1 cup of capsicum.
  19. {Get 1/2 cup of spring onions.
  20. {Prepare 1 cup of mangoes.
  21. {Prepare to taste of Salt.
  22. {Get 1 tbsp of corn flour.

Steps to make Sweet & sour chunky mango chilli chicken:

  1. Cut chicken in cubes and keep in a large bowl.
  2. Add salt, red chilli, lemon juice and corn flour in chicken and mix well.
  3. Deep fry all chicken pieces in hot oil and take out from oil when turn golden brown. Keep a side in a plate.
  4. Take a sauce pan add some oil..
  5. Add chopped garlic and cook a little bit.
  6. Add mango puree, salt, red chilli flakes, lemon juice, soya sauce, chilli sauce, ketchup and honey into oil and cook with garlic till boil comes. Add some water and cook till boil..
  7. Now dissolve cornflour into 3_4 tbsp of water and add into spices. Mix well till mixture thickened..
  8. Than add fried chicken and mix well.
  9. Now add chopped capsicum and mix.
  10. Than add chopped spring onions and mix well.
  11. In the end add chopped mangoes and mix.
  12. Cook for another 2_3 minutes and dish out for serving.

So that's going to wrap it up for this special food sweet & sour chunky mango chilli chicken recipe. Thanks so much for reading. I am confident you can make this at home. There's gonna be more interesting food in home recipes coming up. Don't forget to bookmark this page in your browser, and share it to your loved ones, colleague and friends. Thanks again for reading. Go on get cooking!

How to Make Ultimate Chicken Taco Casserole

How to Make Ultimate Chicken Taco Casserole

Chicken Taco Casserole.

Chicken Taco Casserole

Hello everybody, it's Louise, welcome to my recipe page. Today, I will show you a way to make a special dish, chicken taco casserole. One of my favorites. For mine, I am going to make it a little bit unique. This will be really delicious.

Chicken Taco Casserole is one of the most popular of recent trending foods on earth. It is simple, it is fast, it tastes yummy. It's enjoyed by millions daily. They are nice and they look wonderful. Chicken Taco Casserole is something that I have loved my entire life.

To get started with this particular recipe, we have to first prepare a few ingredients. You can cook chicken taco casserole using 9 ingredients and 8 steps. Here is how you can achieve that.

The ingredients needed to make Chicken Taco Casserole:

  1. {Prepare 4 C of shredded chicken (you can use a rotisserie chicken from the store).
  2. {Take 2 cans (10 3/4 oz) of cream of chicken soup.
  3. {Get 1 C of sour cream.
  4. {Make ready 10 oz of can Rotel (I like 'Original').
  5. {Take 15 oz of can black beans, rinsed and drained.
  6. {Take of Sprinkling of taco seasoning mix (I use very little, but use to taste).
  7. {Take 5 C of coarsely chopped crushed tortilla chips.
  8. {Prepare 2 C of shredded cheddar cheese.
  9. {Get of Chopped tomatoes.

Instructions to make Chicken Taco Casserole:

  1. Heat oven to 350 degrees.
  2. Spray 9x13" casserole dish.
  3. Stir: chicken, soup, sour cream, Rotel, black beans, seasoning in a bowl.
  4. Layer: half the chicken mixture, 3C tortilla chips and half the cheese.
  5. Cover. Bake for 30 minutes.
  6. Uncover. Sprinkle remaining cheese.
  7. Bake uncovered for 10 minutes or until bubbling.
  8. Sprinkle with chopped tomatoes. You could also add chopped black olives (I just didn't have any on hand).

So that's going to wrap this up with this special food chicken taco casserole recipe. Thank you very much for your time. I am confident that you can make this at home. There's gonna be more interesting food at home recipes coming up. Don't forget to save this page on your browser, and share it to your family, friends and colleague. Thank you for reading. Go on get cooking!

Simple Way to Make Perfect Simple Air Fried Chicken - marinated in
lemon & oyster sauce

Simple Way to Make Perfect Simple Air Fried Chicken - marinated in lemon & oyster sauce

Simple Air Fried Chicken - marinated in lemon & oyster sauce.

Simple Air Fried Chicken - marinated in lemon & oyster sauce

Hey everyone, hope you are having an amazing day today. Today, I'm gonna show you how to make a special dish, simple air fried chicken - marinated in lemon & oyster sauce. One of my favorites. This time, I will make it a bit unique. This will be really delicious.

Simple Air Fried Chicken - marinated in lemon & oyster sauce is one of the most well liked of recent trending foods in the world. It's simple, it's quick, it tastes yummy. It's enjoyed by millions daily. Simple Air Fried Chicken - marinated in lemon & oyster sauce is something that I have loved my whole life. They're fine and they look wonderful.

To begin with this particular recipe, we have to prepare a few ingredients. You can have simple air fried chicken - marinated in lemon & oyster sauce using 5 ingredients and 7 steps. Here is how you can achieve that.

The ingredients needed to make Simple Air Fried Chicken - marinated in lemon & oyster sauce:

  1. {Make ready 6-8 pieces of chopped chicken, thawed.
  2. {Take as needed of Rock Salt,.
  3. {Get as needed of Oyster Sauce,.
  4. {Make ready 2-3 of Calamansi or Lemon/Lime juice.
  5. {Make ready as needed of Seasoned Flour for light coating,.

Instructions to make Simple Air Fried Chicken - marinated in lemon & oyster sauce:

  1. Massage your chopped chicken with rock salt or sea salt.
  2. Place the chicken in a container and squeeze lemon or calamansi juice on every piece, massaging as you go..
  3. Pour a few tablespoons Oyster Sauce (I use Maggi). Massage to coat every piece using your hand (1 hand works)..
  4. Get another dry container and place a few pieces of chicken. Add your seasoned flour (I use Tasty Boy), cover and shake. Do the same to the rest of the chicken..
  5. Pre heat your AF for 5 mins at 160•C.
  6. Arrange chicken on the mesh tray, allowing space for air in between the pieces. Cook for 12 mins on each side at 180•C..
  7. To crisp and brown, with the skin side facing the heating element, cook for another 3-4 mins at 200•C. AF varies in cooking so check and adjust temperature and cook time accordingly..

So that's going to wrap this up with this exceptional food simple air fried chicken - marinated in lemon & oyster sauce recipe. Thanks so much for reading. I'm sure you can make this at home. There's gonna be more interesting food at home recipes coming up. Don't forget to bookmark this page in your browser, and share it to your loved ones, colleague and friends. Thank you for reading. Go on get cooking!

Simple Way to Prepare Super Quick Homemade Leftover Turkey Curry

Simple Way to Prepare Super Quick Homemade Leftover Turkey Curry

Leftover Turkey Curry.

Leftover Turkey Curry

Hello everybody, it's Drew, welcome to my recipe page. Today, I'm gonna show you how to make a special dish, leftover turkey curry. One of my favorites food recipes. For mine, I am going to make it a little bit unique. This will be really delicious.

Leftover Turkey Curry is one of the most favored of current trending meals on earth. It's appreciated by millions every day. It's simple, it is quick, it tastes delicious. They're fine and they look fantastic. Leftover Turkey Curry is something which I've loved my whole life.

To begin with this recipe, we must prepare a few components. You can cook leftover turkey curry using 10 ingredients and 3 steps. Here is how you cook that.

The ingredients needed to make Leftover Turkey Curry:

  1. {Get 1 of large onion diced.
  2. {Prepare 1 tsp of fresh ginger grated.
  3. {Prepare 2 of garlic cloves minced.
  4. {Make ready 3 tbsps of korma curry paste.
  5. {Make ready 500 g of cooked turkey diced.
  6. {Take 150 ml of chicken stock.
  7. {Get 400 ml of coconut milk.
  8. {Make ready 50 g of ground almonds.
  9. {Get 2 tbsps of fresh coriander.
  10. {Make ready of salt and pepper for seasoning.

Steps to make Leftover Turkey Curry:

  1. Heat a drizzle of olive oil in a large shallow pan Add the onion, garlic and ginger and saute for a couple of minutes.
  2. Add the chicken stock, korma paste, coconut milk and cooked turkey Bring to the boil and simmer for 20 minutes.
  3. Stir in the ground almonds, coriander and season with salt and pepper Serve with pilau rice.

So that's going to wrap it up for this exceptional food leftover turkey curry recipe. Thank you very much for reading. I'm confident that you can make this at home. There is gonna be more interesting food at home recipes coming up. Don't forget to save this page in your browser, and share it to your loved ones, friends and colleague. Thank you for reading. Go on get cooking!

Easiest Way to Prepare Award-winning Rosemary chicken & mushroom rice
one pot meal

Easiest Way to Prepare Award-winning Rosemary chicken & mushroom rice one pot meal

Rosemary chicken & mushroom rice one pot meal. If you've had our Oven Fried Chicken, Oven Baked Chicken and. Add the rosemary sprigs and the squeezed lemon halves to the skillet; transfer to the oven and roast, uncovered, until the chicken is. Dinner Recipe: Rosemary Lemon Chicken Recipe by Everyday Gourmet with Blakely.

Rosemary chicken & mushroom rice one pot meal Cover the chicken breasts with garlic, then sprinkle with rosemary, lemon juice, and salt and pepper to taste. This post may contain affiliate links. Please check our privacy and I declare this Monday to be Easy Lemon Rosemary Chicken day!

Hello everybody, it is me, Dave, welcome to our recipe page. Today, we're going to make a special dish, rosemary chicken & mushroom rice one pot meal. It is one of my favorites food recipes. For mine, I'm gonna make it a bit tasty. This is gonna smell and look delicious.

Rosemary chicken & mushroom rice one pot meal is one of the most popular of recent trending foods in the world. It is appreciated by millions daily. It is easy, it's fast, it tastes yummy. Rosemary chicken & mushroom rice one pot meal is something which I've loved my whole life. They are fine and they look wonderful.

If you've had our Oven Fried Chicken, Oven Baked Chicken and. Add the rosemary sprigs and the squeezed lemon halves to the skillet; transfer to the oven and roast, uncovered, until the chicken is. Dinner Recipe: Rosemary Lemon Chicken Recipe by Everyday Gourmet with Blakely.

To get started with this particular recipe, we have to first prepare a few ingredients. You can have rosemary chicken & mushroom rice one pot meal using 10 ingredients and 2 steps. Here is how you cook that.

The ingredients needed to make Rosemary chicken & mushroom rice one pot meal:

  1. {Get 1 pack of chicken diced.
  2. {Make ready of Olive oil 1 tsp for cooking.
  3. {Make ready 1 of medium pack of White mushrooms diced.
  4. {Get 1/2 of onion diced.
  5. {Take 3 sprigs of rosemary minced.
  6. {Make ready 1/2 block of low fat cream cheese.
  7. {Make ready 1 can of cream of mushroom soup healthy request.
  8. {Get 1 bag of cooked frozen peas.
  9. {Take 2 cups of cooked rice.
  10. {Make ready to taste of Salt and pepper.

It starts with the humble chicken. Lemon Rosemary Chicken is a moist, flavorful roast chicken dish. It i s so simple to make. Be the first to rate & review!

Instructions to make Rosemary chicken & mushroom rice one pot meal:

  1. Brown the chicken and onions in olive oil and salt and pepper it. When 2/3 of the way cooked add mushrooms, and rosemary..
  2. Ounces mushrooms wilt and chicken is cooked (do not drain any liquid) add the rice, cream of mushroom soup, and cream cheese. Allow to heat through and stir to melt. Add salt at the end and peas last minute. You can sprinkle with Parmesan cheese.

Season the chicken thighs liberally on all sides with salt and pepper. In a small bowl, combine the rosemary and. This Italian-style rosemary chicken simmered in a rich tomato sauce with white beans and olives is Then serve this rosemary chicken with white beans and olives. And finish up with Amaretti Tiramisu. I hate to choose favorites but this recipe is one that sums Push the chicken breasts to one side of the pan and add the remaining garlic and tomatoes to the.

So that's going to wrap it up with this special food rosemary chicken & mushroom rice one pot meal recipe. Thank you very much for your time. I'm confident you can make this at home. There is gonna be more interesting food at home recipes coming up. Don't forget to save this page on your browser, and share it to your loved ones, colleague and friends. Thanks again for reading. Go on get cooking!

Simple Way to Make Perfect Avocado & Tuna Salad

Simple Way to Make Perfect Avocado & Tuna Salad

Avocado & Tuna Salad.

Avocado & Tuna Salad

Hello everybody, hope you're having an incredible day today. Today, I will show you a way to prepare a special dish, avocado & tuna salad. It is one of my favorites. For mine, I am going to make it a little bit tasty. This will be really delicious.

Avocado & Tuna Salad is one of the most well liked of current trending meals in the world. It's simple, it is quick, it tastes delicious. It is enjoyed by millions daily. Avocado & Tuna Salad is something which I've loved my entire life. They're fine and they look fantastic.

To begin with this particular recipe, we have to prepare a few ingredients. You can cook avocado & tuna salad using 8 ingredients and 4 steps. Here is how you can achieve that.

The ingredients needed to make Avocado & Tuna Salad:

  1. {Get of Small Avocado.
  2. {Make ready of tuna.
  3. {Get of red onion.
  4. {Make ready of celery sticks.
  5. {Prepare of spring onion.
  6. {Get of coriander.
  7. {Take of lemon juice.
  8. {Get of Salt and Pepper.

Steps to make Avocado & Tuna Salad:

  1. Drain the oil out the tuna tins. Add the tuna into the clean bowl..
  2. Fine diced red onion, spring onion, celery sticks. Add all the ingredients into the tuna bowl..
  3. Take the skin off the avocado, put the fleshy part of the avocado in the bowl. Add chopped coriander, lemon juice, salt and pepper..
  4. Using the back of the fork or clean hands to mash up the avocado. Mix all the ingredients very well. Served the salad in the bowl or in the wrap..

So that's going to wrap it up for this special food avocado & tuna salad recipe. Thank you very much for reading. I am confident that you will make this at home. There's gonna be interesting food in home recipes coming up. Remember to save this page in your browser, and share it to your family, friends and colleague. Thank you for reading. Go on get cooking!

Recipe of Perfect Loaded Pulled pork fries

Recipe of Perfect Loaded Pulled pork fries

Loaded Pulled pork fries.

Loaded Pulled pork fries

Hey everyone, I hope you're having an amazing day today. Today, I will show you a way to prepare a special dish, loaded pulled pork fries. It is one of my favorites food recipes. For mine, I will make it a little bit unique. This is gonna smell and look delicious.

Loaded Pulled pork fries is one of the most well liked of recent trending foods in the world. It's enjoyed by millions daily. It is simple, it is fast, it tastes yummy. Loaded Pulled pork fries is something that I've loved my whole life. They're nice and they look wonderful.

To get started with this recipe, we have to prepare a few components. You can cook loaded pulled pork fries using 9 ingredients and 3 steps. Here is how you can achieve it.

The ingredients needed to make Loaded Pulled pork fries:

  1. {Make ready 2 1/2 lbs of pork shoulder.
  2. {Take 1 cup of root beer.
  3. {Prepare 2 cups of bbq sauce.
  4. {Take 1 bag of frozen fries.
  5. {Get of Green onions Chopped.
  6. {Prepare 1 cup of sour cream.
  7. {Make ready 2 cups of cheddar cheese shredded.
  8. {Make ready of Side.
  9. {Get of Salad.

Steps to make Loaded Pulled pork fries:

  1. Add pork shoulder, root beer, bbq, in slow cooker. Cook for 8-10 hrs on low..
  2. Shred pork, cook fries according to package directions (I cook my fries in the oven on a baking sheet make step 3 easier that way.).
  3. Layer pork and cheese on top of fries return to oven for 4-10 minutes until cheese is melted garnish with sliced onions and sour cream serve salad.

So that's going to wrap this up for this special food loaded pulled pork fries recipe. Thanks so much for reading. I'm confident that you will make this at home. There is gonna be interesting food at home recipes coming up. Remember to save this page on your browser, and share it to your family, colleague and friends. Thank you for reading. Go on get cooking!

Step-by-Step Guide to Make Favorite Broccoli and chicken with sesame
vinegar

Step-by-Step Guide to Make Favorite Broccoli and chicken with sesame vinegar

Broccoli and chicken with sesame vinegar.

Broccoli and chicken with sesame vinegar

Hello everybody, I hope you are having an amazing day today. Today, I will show you a way to make a distinctive dish, broccoli and chicken with sesame vinegar. One of my favorites. For mine, I am going to make it a bit unique. This will be really delicious.

Broccoli and chicken with sesame vinegar is one of the most well liked of recent trending foods on earth. It is easy, it's fast, it tastes yummy. It's appreciated by millions every day. They are nice and they look fantastic. Broccoli and chicken with sesame vinegar is something that I have loved my whole life.

To get started with this particular recipe, we have to prepare a few ingredients. You can cook broccoli and chicken with sesame vinegar using 7 ingredients and 5 steps. Here is how you cook it.

The ingredients needed to make Broccoli and chicken with sesame vinegar:

  1. {Take 1/2 of steamed chicken breast.
  2. {Make ready 1/2 of broccoli.
  3. {Prepare of ★3 tablespoons of ground sesame.
  4. {Make ready of ★1 tablespoon of soy sauce.
  5. {Get of ★1 tablespoon of vinegar.
  6. {Make ready of ★2 teaspoons of sugar.
  7. {Make ready of ★1 teaspoon of cooking sake.

Steps to make Broccoli and chicken with sesame vinegar:

  1. Cut the steamed chicken breast into small pieces..
  2. Cut broccoli into florets and boil..
  3. Mix together ★..
  4. Mix together the seasoning, broccoli, and chicken..
  5. Serve..

So that is going to wrap this up for this exceptional food broccoli and chicken with sesame vinegar recipe. Thanks so much for reading. I am confident that you can make this at home. There is gonna be more interesting food at home recipes coming up. Remember to bookmark this page on your browser, and share it to your loved ones, colleague and friends. Thanks again for reading. Go on get cooking!

Recipe of Homemade "Alexis's" Hawaiian Chicken Kabobs

Recipe of Homemade "Alexis's" Hawaiian Chicken Kabobs

"Alexis's" Hawaiian Chicken Kabobs.

"Alexis's" Hawaiian Chicken Kabobs

Hey everyone, it is Louise, welcome to my recipe site. Today, we're going to prepare a special dish, "alexis's" hawaiian chicken kabobs. One of my favorites food recipes. For mine, I am going to make it a little bit tasty. This is gonna smell and look delicious.

"Alexis's" Hawaiian Chicken Kabobs is one of the most popular of current trending foods on earth. It is appreciated by millions daily. It's simple, it is fast, it tastes delicious. "Alexis's" Hawaiian Chicken Kabobs is something that I've loved my entire life. They are nice and they look fantastic.

To begin with this particular recipe, we have to first prepare a few components. You can cook "alexis's" hawaiian chicken kabobs using 13 ingredients and 8 steps. Here is how you can achieve that.

The ingredients needed to make "Alexis's" Hawaiian Chicken Kabobs:

  1. {Get 15 oz of CAN UNSWEETENED PINEAPPLE CHUNKS.
  2. {Take 1/2 cup of Soy sauce.
  3. {Prepare 1/4 cup of vegetable oil.
  4. {Make ready 1 tbsp of brown sugar.
  5. {Take 1 tsp of garlic powder.
  6. {Make ready 2 tsp of ground ginger.
  7. {Make ready 1 tsp of dried mustard.
  8. {Get 1/4 tsp of fresh ground pepper.
  9. {Make ready 1 large of green pepper cut in 1 inch pcs..
  10. {Prepare 12 medium of mushrooms.
  11. {Take 18 of cherry tomatoes.
  12. {Prepare 1 1/2 lb of boneless chicken breast cut in cubes.
  13. {Prepare 1 of rice cooked hot.

Instructions to make "Alexis's" Hawaiian Chicken Kabobs:

  1. In a large pot, drain pineapple (keeping 1/2 cup of juice), bringing to a boil the 1/2 cup pineapple juice, brown sugar, vegetable oil, soy sauce, dry mustard, fresh ground pepper, ground ginger, then reduce heat and simmer 5 minutes..
  2. Place chicken in a large shallow dish, pour marinade over the chicken, cover and chill 1 hour.
  3. Remove chicken from marinade, alternating chicken, green peppers,tomatoes, pineapples and mushrooms on skewer sticks, then grill over hot coals until chicken is done turn and baste frequently with marinade..
  4. Serve over hot cooked rice.
  5. Servings 6.
  6. Prep Time: 12 minutes.
  7. Cook Time: 20 minutes.
  8. Total Time: 32 minutes.

So that's going to wrap this up for this exceptional food "alexis's" hawaiian chicken kabobs recipe. Thanks so much for your time. I'm confident that you can make this at home. There is gonna be more interesting food at home recipes coming up. Remember to save this page on your browser, and share it to your family, colleague and friends. Thank you for reading. Go on get cooking!

Recipe of Quick Tahu Gejrot (Indonesian Fried Tofu with Sweet, Savoury,
Sour, Spicy Dressing)

Recipe of Quick Tahu Gejrot (Indonesian Fried Tofu with Sweet, Savoury, Sour, Spicy Dressing)

Tahu Gejrot (Indonesian Fried Tofu with Sweet, Savoury, Sour, Spicy Dressing).

Tahu Gejrot (Indonesian Fried Tofu with Sweet, Savoury, Sour, Spicy Dressing)

Hey everyone, it is me, Dave, welcome to my recipe site. Today, I'm gonna show you how to make a special dish, tahu gejrot (indonesian fried tofu with sweet, savoury, sour, spicy dressing). It is one of my favorites food recipes. For mine, I will make it a little bit tasty. This will be really delicious.

Tahu Gejrot (Indonesian Fried Tofu with Sweet, Savoury, Sour, Spicy Dressing) is one of the most popular of current trending meals on earth. It's easy, it's fast, it tastes yummy. It's appreciated by millions every day. They are fine and they look fantastic. Tahu Gejrot (Indonesian Fried Tofu with Sweet, Savoury, Sour, Spicy Dressing) is something which I have loved my whole life.

To begin with this particular recipe, we must prepare a few components. You can have tahu gejrot (indonesian fried tofu with sweet, savoury, sour, spicy dressing) using 8 ingredients and 4 steps. Here is how you cook that.

The ingredients needed to make Tahu Gejrot (Indonesian Fried Tofu with Sweet, Savoury, Sour, Spicy Dressing):

  1. {Take 1 pack of Firm tofu.
  2. {Take 1/4 of Lime.
  3. {Prepare 1 cup of Water.
  4. {Take 1 clove of Garlic.
  5. {Prepare 5 cloves of Shallot.
  6. {Take of Some Fresh chillies (according to your liking).
  7. {Take 1 tbsp of Palm sugar.
  8. {Prepare To taste of Salt.

Instructions to make Tahu Gejrot (Indonesian Fried Tofu with Sweet, Savoury, Sour, Spicy Dressing):

  1. Fry tofu, drain, and cut into pieces..
  2. Let's make the dressing! Mash palm sugar, salt, and garlic finely. Mash shallots and chillies coarsely..
  3. Add water and lime water, stir, and taste it..
  4. Pour the dressing onto sliced tofu, and done! 😄.

So that's going to wrap this up for this exceptional food tahu gejrot (indonesian fried tofu with sweet, savoury, sour, spicy dressing) recipe. Thanks so much for reading. I'm sure you will make this at home. There's gonna be interesting food in home recipes coming up. Don't forget to save this page on your browser, and share it to your family, friends and colleague. Thank you for reading. Go on get cooking!

Recipe of Favorite Black Garlic Korean Style BBQ Chicken Skewers

Recipe of Favorite Black Garlic Korean Style BBQ Chicken Skewers

Black Garlic Korean Style BBQ Chicken Skewers.

Black Garlic Korean Style BBQ Chicken Skewers

Hello everybody, I hope you are having an amazing day today. Today, I will show you a way to prepare a distinctive dish, black garlic korean style bbq chicken skewers. One of my favorites. For mine, I'm gonna make it a little bit unique. This will be really delicious.

Black Garlic Korean Style BBQ Chicken Skewers is one of the most favored of current trending meals in the world. It is simple, it is quick, it tastes delicious. It's appreciated by millions daily. They're fine and they look wonderful. Black Garlic Korean Style BBQ Chicken Skewers is something that I've loved my entire life.

To get started with this particular recipe, we must first prepare a few ingredients. You can cook black garlic korean style bbq chicken skewers using 20 ingredients and 6 steps. Here is how you cook that.

The ingredients needed to make Black Garlic Korean Style BBQ Chicken Skewers:

  1. {Take 4 of large metal (or bamboo) skewers.
  2. {Make ready of Chicken thighs - 8 bone out, skin off, then sliced into pieces (big enough to fit on two skewers - but thin enough to cook fairly quickly).
  3. {Get 4 tablespoons of buttermilk.
  4. {Prepare 1 of little veg oil for brushing.
  5. {Prepare of BBQ Glaze + dip.
  6. {Get 2 tablespoons of soy sauce.
  7. {Make ready 1 tablespoon of sesame oil.
  8. {Take 1 cm of piece ginger - grated.
  9. {Make ready 1 of garlic clove - grated.
  10. {Take 1 teaspoon of black garlic paste.
  11. {Take Dash of rice vinegar (or white wine vinegar).
  12. {Make ready 2 tablespoons of ketchup.
  13. {Take 1 tablespoon of sriracha sauce.
  14. {Get Pinch of gochugaru (optional).
  15. {Prepare 2 tablespoons of honey.
  16. {Get 2 tablespoons of lime juice.
  17. {Get of Garnish.
  18. {Get 2 teaspoons of sesame seeds.
  19. {Prepare 2 teaspoons of finely sliced chives.
  20. {Prepare Squeeze of fresh lime juice.

Steps to make Black Garlic Korean Style BBQ Chicken Skewers:

  1. Add the chopped chicken thighs to the buttermilk and coat thoroughly. Leave in the fridge preferably overnight or at least 3 hours..
  2. Add the sauce ingredients together in a bowl and mix together - set the bowl aside. (Take out approximately 5 tablespoons and also set aside in a separate bowl for dipping the cooked chicken.).
  3. Thread the buttermilk marinated chicken on to two skewers so it won’t rotate when you flip it..
  4. Brush with a little oil, then cook the plain skewers 6-8 minutes per side on the bbq (we always use a @barbequick) or under the grill til almost cooked through..
  5. Now start to brush on the sauce coating each side & turning frequently, so as not to burn. (You will want a little char though). Black Garlic Korean Style BBQ Chicken Skewers
  6. Once cooked through, remove from the skewers & add the garnish. Use the 5 tablespoons of sauce kept to one side for dipping.

So that's going to wrap it up with this special food black garlic korean style bbq chicken skewers recipe. Thank you very much for reading. I am confident that you can make this at home. There is gonna be interesting food at home recipes coming up. Remember to bookmark this page in your browser, and share it to your loved ones, friends and colleague. Thanks again for reading. Go on get cooking!

How to Prepare Homemade Creamed spinach on toasted English muffins

How to Prepare Homemade Creamed spinach on toasted English muffins

Creamed spinach on toasted English muffins. What can be better than a side of creamy, nutmeg-infused spinach? Perfect to accompany any roast and especially good at Christmas. How to make creamed chipped beef on toast.

Creamed spinach on toasted English muffins Spoon leftover creamed spinach onto the toast slices, spreading the spinach all the way to the edges. Top each with a sprinkle of Parmigiano-Reggiano cheese. Then I added a tsp of horseradish which gives it a little zing.

Hey everyone, hope you're having an amazing day today. Today, we're going to make a distinctive dish, creamed spinach on toasted english muffins. One of my favorites food recipes. This time, I'm gonna make it a bit tasty. This is gonna smell and look delicious.

What can be better than a side of creamy, nutmeg-infused spinach? Perfect to accompany any roast and especially good at Christmas. How to make creamed chipped beef on toast.

Creamed spinach on toasted English muffins is one of the most well liked of current trending foods in the world. It's easy, it is fast, it tastes delicious. It's appreciated by millions every day. They're nice and they look fantastic. Creamed spinach on toasted English muffins is something that I have loved my entire life.

To begin with this particular recipe, we have to prepare a few ingredients. You can cook creamed spinach on toasted english muffins using 8 ingredients and 4 steps. Here is how you cook it.

The ingredients needed to make Creamed spinach on toasted English muffins:

  1. {Take of spinach.
  2. {Make ready of Good knob of butter.
  3. {Get of plain flour.
  4. {Take of tspn minced garlic.
  5. {Get of milk.
  6. {Make ready of cream.
  7. {Get of English muffin per person.
  8. {Get of Optional eggs, bacon and sausages.

It's also great on English muffins! Введите запрос. Creamed Spinach Recipe - Steakhouse Creamed Spinach. Смотреть позже. Поделиться. I hope you enjoy this easy Creamed Spinach Recipe! I started fixin' for some creamed spinach when I was pregnant — yes, they aren't kidding about those iron cravings — but I never got to making it this summer.

Instructions to make Creamed spinach on toasted English muffins:

  1. Place the spinach in a colander and pour over boiling water to wilt the spinach (you may need to do this a couple of times) once done squeeze out as much excess liquid as possible. Then chop and set to one side.
  2. In a pan add the butter and when melted and bubbling at the flour to crest a rue. Allow to cool out for a minute or 2 and add the milk a little at a time to make a smooth paste. Then slowly add the cream followed by the garlic..
  3. When the sauce is all together check the seasoning and then add the spinach. Combine well and you are ready to go..
  4. Serve on toasted English muffins along with what ever else you fancy.

Strain the cream and discard the ham. Then, take a toasted english muffin, mound some of that leftover Thanksgiving turkey (thinly sliced). Fresh crisp buttered toast is topped with a layer of creamed spinach, crisp bacon and then eggs. After that you just stir in some sour cream, and a bit of lemon juice and seasoning. Pile it on some hot buttered toast and top with some crisp streaky bacon and eggs. . . poached or fried. "English muffins" in particular are designed to be toasted, especially in the US.

So that's going to wrap it up with this exceptional food creamed spinach on toasted english muffins recipe. Thanks so much for your time. I'm confident you will make this at home. There is gonna be interesting food at home recipes coming up. Don't forget to bookmark this page on your browser, and share it to your family, colleague and friends. Thanks again for reading. Go on get cooking!

Step-by-Step Guide to Make Homemade Easy Homemade Chili Sauce (Sambel
cabe for bakso or mie ayam)

Step-by-Step Guide to Make Homemade Easy Homemade Chili Sauce (Sambel cabe for bakso or mie ayam)

Easy Homemade Chili Sauce (Sambel cabe for bakso or mie ayam).

Easy Homemade Chili Sauce (Sambel cabe for bakso or mie ayam)

Hello everybody, it's John, welcome to my recipe site. Today, I will show you a way to prepare a special dish, easy homemade chili sauce (sambel cabe for bakso or mie ayam). One of my favorites. This time, I will make it a little bit unique. This is gonna smell and look delicious.

Easy Homemade Chili Sauce (Sambel cabe for bakso or mie ayam) is one of the most favored of current trending foods on earth. It is easy, it's fast, it tastes delicious. It is appreciated by millions daily. They're fine and they look fantastic. Easy Homemade Chili Sauce (Sambel cabe for bakso or mie ayam) is something that I have loved my whole life.

To begin with this particular recipe, we must first prepare a few components. You can cook easy homemade chili sauce (sambel cabe for bakso or mie ayam) using 5 ingredients and 3 steps. Here is how you can achieve that.

The ingredients needed to make Easy Homemade Chili Sauce (Sambel cabe for bakso or mie ayam):

  1. {Prepare 10-15 of Thai chili (bird-eye chili).
  2. {Take 5 of red sweet bell pepper (the small one).
  3. {Get of Salt to taste.
  4. {Take 1/8-1/4 tsp of chicken powder optional.
  5. {Prepare of 1 tsp or more lemon juice (optional).

Steps to make Easy Homemade Chili Sauce (Sambel cabe for bakso or mie ayam):

  1. Boil the Thai chili and bell pepper together for 5 minutes. Removed and transfer to the blender mug. Add salt and chicken powder if use it. Then blend it until smooth. In this process you can add 1 tbsp of water if need it..
  2. Add lemon juice if you like, taste it. And voila, the chili sauce is ready. You can store it in the refrigerator for a week. Or you can fridge it for after 3 months. Enjoy!.
  3. “Dine What You Want at Your Home” HappyCooking 👩‍🍳❤️.

So that is going to wrap this up with this special food easy homemade chili sauce (sambel cabe for bakso or mie ayam) recipe. Thanks so much for reading. I'm confident you will make this at home. There's gonna be interesting food in home recipes coming up. Don't forget to bookmark this page in your browser, and share it to your family, friends and colleague. Thank you for reading. Go on get cooking!

Recipe of Perfect Chicken White Biryani

Recipe of Perfect Chicken White Biryani

Chicken White Biryani.

Chicken White Biryani

Hello everybody, I hope you're having an incredible day today. Today, we're going to prepare a special dish, chicken white biryani. One of my favorites food recipes. This time, I will make it a bit unique. This will be really delicious.

Chicken White Biryani is one of the most popular of recent trending foods in the world. It's appreciated by millions every day. It is easy, it's fast, it tastes delicious. Chicken White Biryani is something which I have loved my whole life. They are nice and they look fantastic.

To get started with this recipe, we have to prepare a few ingredients. You can cook chicken white biryani using 22 ingredients and 4 steps. Here is how you can achieve that.

The ingredients needed to make Chicken White Biryani:

  1. {Take Half kg of Rice soaked for 30 mins.
  2. {Take 4 of big onions sliced.
  3. {Take 1 cup of yogurt beaten.
  4. {Make ready 6 of green chillies in the form of paste.
  5. {Take 6 of red button chillies.
  6. {Get 1 tablespoon of zeera.
  7. {Take 1 table spoon of dhaniya powder.
  8. {Prepare 1 table spoon of kala namak.
  9. {Get 1 table spoon of ginger garlic paste.
  10. {Make ready 1 table spoon of black pepper.
  11. {Make ready 1 table spoon of mix garam masla powber.
  12. {Get 4 of small elachi.
  13. {Prepare 2 of bari elachi.
  14. {Make ready 1 of tez pata.
  15. {Take 1 of darchini stick.
  16. {Take 4 of black peppers.
  17. {Make ready 2 of long.
  18. {Take 1 cup of oil.
  19. {Get of water as required.
  20. {Get half of cup fried onion.
  21. {Make ready 2 of potatoes in pieces.
  22. {Prepare 10 of curry leaves.

Steps to make Chicken White Biryani:

  1. Heat half cup oil and add sliced onion and fry until soft add in ginger garlic paste and fry for a while, then add chicken, potatoes and all spices. cook for a while add in little water and cook until chicken is soft. In the end add yogurt and cook on high flame until oil separates.
  2. Tarka of curry leaves : heat remaining oil and add in curry leaves. Let them simmer. Add this tarka to chicken masala.
  3. Boil rice with salt as per taste. make sure rice are half done. Strain the water from the rice.
  4. Layer rice and chicken masala. In the end top rice with fried onions and give dam for about 15 mins on low to medium flame. Mix everything before serving. Yummy white biryani is ready. Enjoy......:).

So that's going to wrap this up with this special food chicken white biryani recipe. Thank you very much for your time. I'm confident that you can make this at home. There is gonna be interesting food in home recipes coming up. Remember to bookmark this page in your browser, and share it to your loved ones, colleague and friends. Thanks again for reading. Go on get cooking!

Recipe of Speedy Jerusalem chicken, grilled artichoke hearts, Asparagus
on top of angel hair pasta

Recipe of Speedy Jerusalem chicken, grilled artichoke hearts, Asparagus on top of angel hair pasta

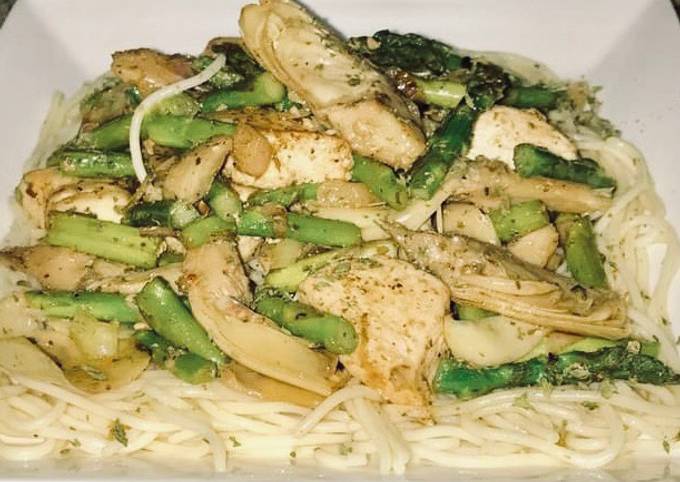
Jerusalem chicken, grilled artichoke hearts, Asparagus on top of angel hair pasta. Steps to Prepare Speedy Jerusalem chicken, grilled artichoke hearts, Asparagus on top of angel hair pasta Easy..pasta, chicken, asparagus, artichoke hearts, and sun-dried tomato is a great way to celebrate asparagus season. If I do this one again I think I will use angel hair pasta and make an alfredo sauce and top it with Reviews for: Photos of Chicken Penne with Asparagus, Sun-dried Tomatoes. Serve over angel hair pasta for a dish that is fit for your most elegant dinner parties.

Jerusalem chicken, grilled artichoke hearts, Asparagus on top of angel hair pasta These particular artichokes look more like a tuber and do not grow here in the states. Recipe: Delicious Jerusalem chicken, grilled artichoke hearts, Asparagus on top of angel hair. See recipes for Jerusalem chicken, grilled artichoke hearts, Asparagus on top of angel hair pasta too. asparagus•chicken breast•Small jar of marinated artichoke hearts•Salt and pepper•Lemon juice for chicken•pasta•olive oil.

Hello everybody, I hope you're having an amazing day today. Today, I will show you a way to make a distinctive dish, jerusalem chicken, grilled artichoke hearts, asparagus on top of angel hair pasta. One of my favorites food recipes. This time, I will make it a bit tasty. This is gonna smell and look delicious.

Jerusalem chicken, grilled artichoke hearts, Asparagus on top of angel hair pasta is one of the most favored of recent trending foods on earth. It is easy, it is quick, it tastes delicious. It is appreciated by millions every day. They're nice and they look fantastic. Jerusalem chicken, grilled artichoke hearts, Asparagus on top of angel hair pasta is something that I've loved my whole life.

Steps to Prepare Speedy Jerusalem chicken, grilled artichoke hearts, Asparagus on top of angel hair pasta Easy..pasta, chicken, asparagus, artichoke hearts, and sun-dried tomato is a great way to celebrate asparagus season. If I do this one again I think I will use angel hair pasta and make an alfredo sauce and top it with Reviews for: Photos of Chicken Penne with Asparagus, Sun-dried Tomatoes. Serve over angel hair pasta for a dish that is fit for your most elegant dinner parties.

To begin with this recipe, we must prepare a few ingredients. You can cook jerusalem chicken, grilled artichoke hearts, asparagus on top of angel hair pasta using 7 ingredients and 1 steps. Here is how you can achieve that.

The ingredients needed to make Jerusalem chicken, grilled artichoke hearts, Asparagus on top of angel hair pasta:

  1. {Prepare 1 bunch of asparagus.
  2. {Make ready 4 of chicken breast.
  3. {Make ready of Small jar of marinated artichoke hearts.
  4. {Prepare to taste of Salt and pepper.
  5. {Make ready 1/4 of Lemon juice for chicken.
  6. {Make ready 1 handful of pasta.
  7. {Get 1/4 cup of olive oil.

Chicken with Artichokes and Angel Hair. Serve chicken and sauce over pasta, topped with parsley. I would have added fresh lemon if I had any, and I served with Romano cheese on top. I used what I had in my pantry whole wheat angel hair and hearts of palm instead of artichokes.

Instructions to make Jerusalem chicken, grilled artichoke hearts, Asparagus on top of angel hair pasta:

  1. Fresh lemon juice Olive oil on chicken breast Salt and pepper to taste or use a seasoning salt, Olive oil on asparagus and grill both. In a sauté pan 1 tablespoon of butter, Marinated artichokes and 1/4 juice from marinated artichoke jar then sliced chicken and asparagus after cooking and cooking sauce for two minutes serve on top of pasta or rice whatever you prefer.

Pasta with Grilled Chicken and Asparagus. Top reviews from the United States. We typically eat al dente pasta. Quick tip - add a bit of chicken broth to the water you use to boil. It has a really good taste to them.

So that's going to wrap this up for this exceptional food jerusalem chicken, grilled artichoke hearts, asparagus on top of angel hair pasta recipe. Thank you very much for your time. I am sure you will make this at home. There is gonna be interesting food in home recipes coming up. Don't forget to save this page on your browser, and share it to your loved ones, friends and colleague. Thanks again for reading. Go on get cooking!